Invoice & Estimate Settings
To access your invoice and estimate settings go to the gear icon in the top right corner → Invoices, Estimates & Receipts
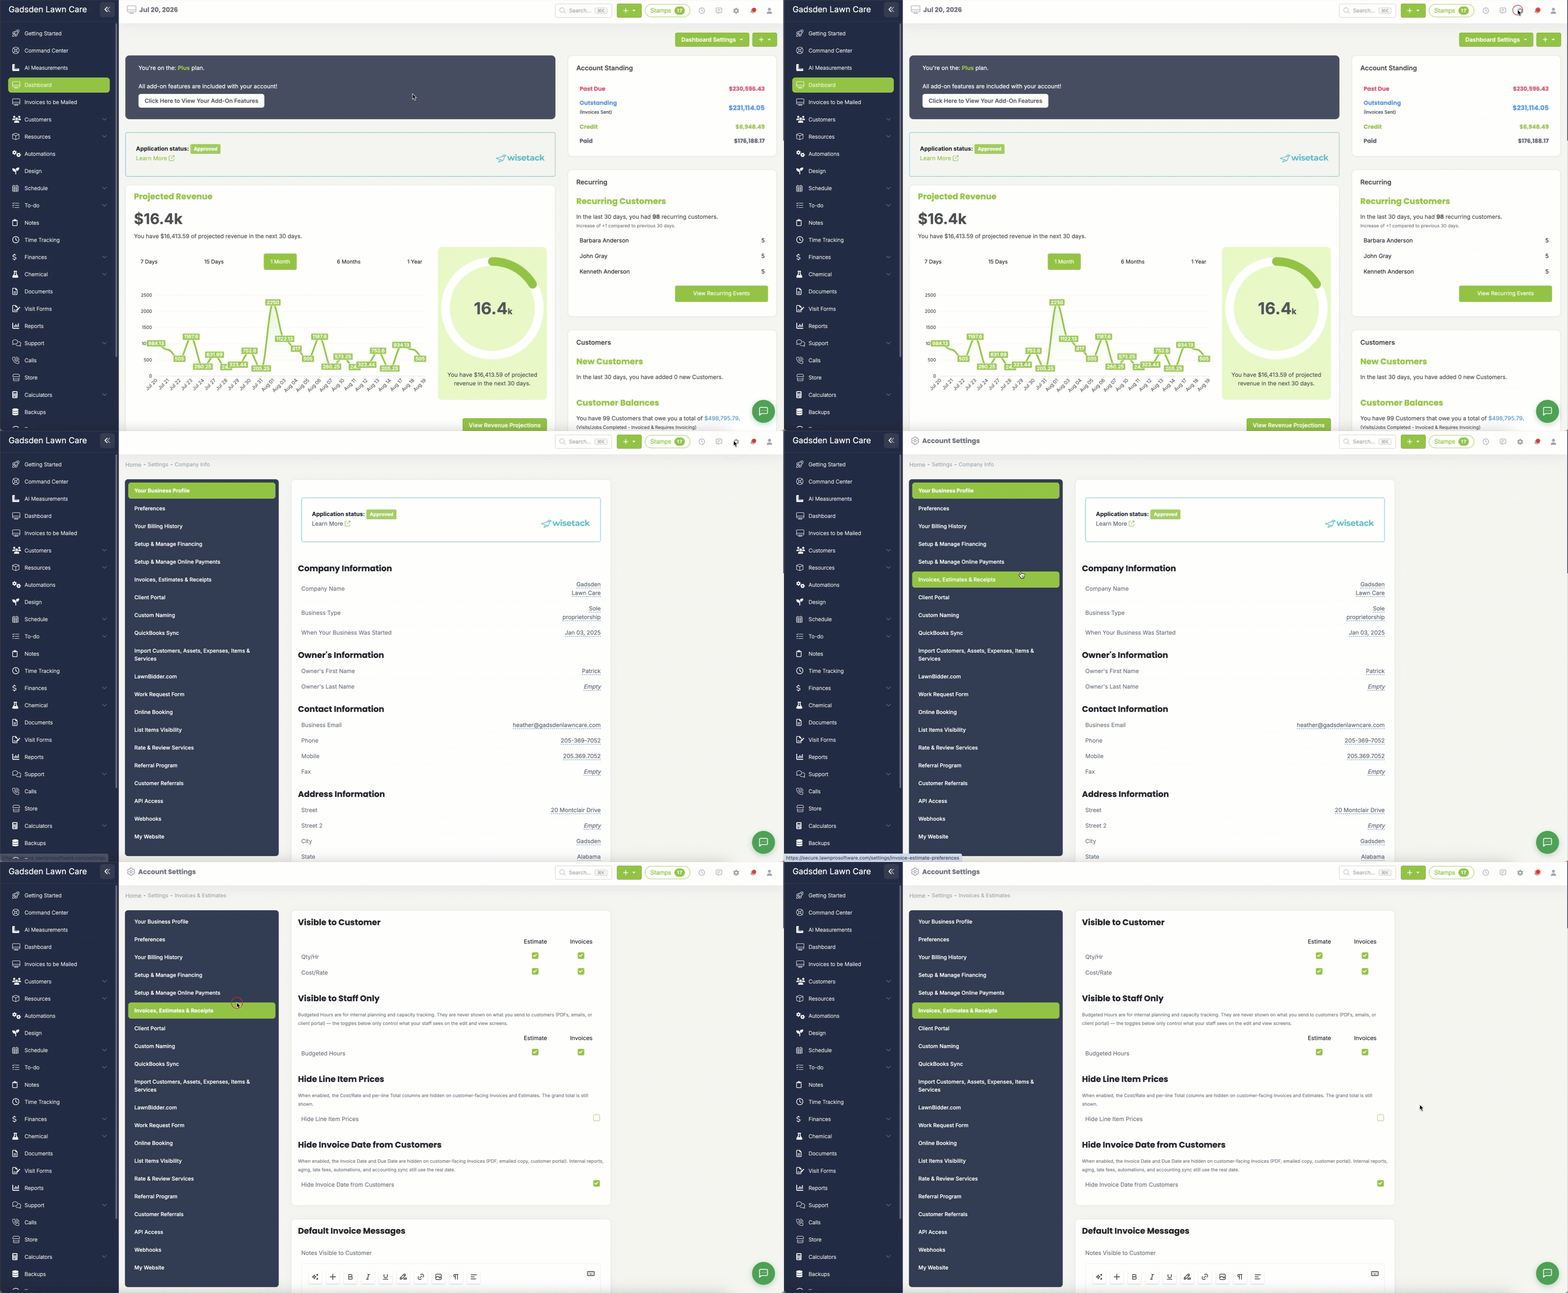
Visible to Customer
You can control what pricing information your customers see on their estimates and invoices. There are two options you can toggle on or off for both estimates and invoices separately:
Cost/Rate — When enabled, the price per unit or hourly rate for each line item will be visible to your customer. Turn this off if you only want your customers to see the total amount rather than the individual rates.
Qty/Hr — When enabled, the quantity or hours for each line item will be visible to your customer on their estimate or invoice. Turn this off if you don’t want your customers to see how many hours or units were used.
Visible to Staff Only
Budgeted Hours — Budgeted hours are for internal planning and capacity tracking only. They are never shown to your customers on PDFs, emails, or the client portal. You can toggle whether your staff can see budgeted hours on the edit and view screens for both estimates and invoices.
Hide Line Item Prices
When enabled, the Cost/Rate and per-line total columns are hidden on customer-facing invoices and estimates. This is useful if you prefer your customers to only see the grand total rather than a breakdown of individual line item prices.
Note: The grand total is always shown to the customer even when this setting is enabled
Hide Invoice Date from Customers
When enabled, the invoice date and due date are hidden on customer-facing invoices. This means your customers will not see the date on their PDF, emailed copy, or in their customer portal.
Note: Even when this setting is enabled, internal reports, aging reports, late fees, automations, and accounting sync will still use the real invoice date. This setting only affects what your customer sees.
Default Estimate Messages
This is where you set the default notes and terms that will automatically appear on every estimate you send.
Notes Visible to Customer — This is a message that will appear on every estimate your customer receives. This is a great place to add a welcome message, a brief description of your services, or any information you want your customer to see before approving their estimate. You can format this message using the text editor.
Terms — This is where you set your default estimate terms. For example “This estimate expires in 30 days” or any conditions you want your customer to agree to before approving. You can format this message using the text editor.
Note: These are your default messages and will apply to all estimates. If you need different notes or terms for a specific customer you can override these in the customer’s profile.
Invoice Address Settings
Control how your property address is displayed on invoices and estimates. You can also choose to show your phone number, email address, and website URL.
Late Fees
Set automatic late fees for overdue invoices. You can set a dollar amount or a percentage and choose how many days after the invoice is sent the late fee applies. You can add multiple late fee rules. Note: Changing late fee rules here does not affect invoices that have already been created.
For more on Late Fees click here.
Hide Line Item Prices
When enabled, the Cost/Rate and per-line total columns are hidden on customer-facing invoices and estimates. This is useful if you prefer your customers to only see the grand total rather than a breakdown of individual line item prices.
Note: The grand total is always shown to the customer even when this setting is enabled.
Hide Invoice Date from Customers
When enabled, the invoice date and due date are hidden on customer-facing invoices. This means your customers will not see the date on their PDF, emailed copy, or in their customer portal.
Note: Even when this setting is enabled, internal reports, aging reports, late fees, automations, and accounting sync will still use the real invoice date. This setting only affects what your customer sees.
Default Invoice Messages
This is where you set the default notes and terms that will automatically appear on every invoice you send.
Notes Visible to Customer — This is a message that will appear on every invoice your customer receives. This is a great place to add payment instructions, a thank you message, or any information you want every customer to see. You can format this message using the text editor.
Terms — This is where you set your default payment terms. For example “Payment due upon receipt” or “Invoices past 15 days incur a 1% late charge.” Your terms will appear on every invoice you send. You can format this message using the text editor.
Note: These are your default messages and will apply to all invoices. If you need different notes or terms for a specific customer you can override these in the customer’s profile.
Default Estimate Messages
This is where you set the default notes and terms that will automatically appear on every estimate you send.
Notes Visible to Customer — This is a message that will appear on every estimate your customer receives. This is a great place to add a welcome message, a brief description of your services, or any information you want your customer to see before approving their estimate. You can format this message using the text editor.
Terms — This is where you set your default estimate terms. For example “This estimate expires in 30 days” or any conditions you want your customer to agree to before approving. You can format this message using the text editor.
Note: These are your default messages and will apply to all estimates. If you need different notes or terms for a specific customer you can override these in the customer’s profile.
Default Invoice Email Settings
This is where you control how invoices are sent to your customers by email.
Default Invoice Email Template — Select the default email template that will be used when sending invoices to your customers by email. You can create and manage your email templates in the Email Templates section.
Attach PDF of Invoice to Email — When enabled, a PDF copy of the invoice will automatically be attached to the email your customer receives. This is useful if your customer prefers to save or print their invoice.
Default Invoice Messages
This is where you control how invoices are sent to your customers by email.
Default Invoice Email Template — Select the default email template that will be used when sending invoices to your customers by email. You can create and manage your email templates in the Email Templates section.
Attach PDF of Invoice to Email — When enabled, a PDF copy of the invoice will automatically be attached to the email your customer receives. This is useful if your customer prefers to save or print their invoice.
Notes Visible to Customer — This is a message that will appear on every invoice your customer receives. This is a great place to add payment instructions, a thank you message, or any information you want every customer to see. You can format this message using the text editor.
Terms — This is where you set your default payment terms. For example “Payment due upon receipt” or “Invoices past 15 days incur a 1% late charge.” Your terms will appear on every invoice you send. You can format this message using the text editor.
Note: These are your default messages and will apply to all invoices. If you need different notes or terms for a specific customer you can override these in the customer’s profile.
Default Estimate Message
This is where you set the default notes and terms that will automatically appear on every estimate you send.
Notes Visible to Customer — This is a message that will appear on every estimate your customer receives. This is a great place to add a welcome message, a brief description of your services, or any information you want your customer to see before approving their estimate. You can format this message using the text editor.
Terms — This is where you set your default estimate terms. For example “This estimate expires in 30 days” or any conditions you want your customer to agree to before approving. You can format this message using the text editor.
Note: These are your default messages and will apply to all estimates. If you need different notes or terms for a specific customer you can override these in the customer’s profile.
Default Invoice Email Settings
This is where you control how invoices are sent to your customers by email.
Default Invoice Email Template — Select the default email template that will be used when sending invoices to your customers by email. You can create and manage your email templates in the Email Templates section.
Attach PDF of Invoice to Email — When enabled, a PDF copy of the invoice will automatically be attached to the email your customer receives. This is useful if your customer prefers to save or print their invoice.
Preferred Invoice Send Method
This is where you set how you prefer to send invoices to your customers by default.
Send Invoice By Text Message — When set to Text Message, LawnPro will default to sending invoices via text message rather than email. This is a great option if most of your customers prefer to receive and pay their invoices by text.
Note: You can always change the send method on an individual invoice if needed. This setting just controls what method is selected by default when you go to send an invoice.
Default Invoice SMS Settings
This is where you control the default text message that is sent to your customers when you send them an invoice by text.
Default Invoice SMS Message — Select the default text message template that will be used when sending invoices to your customers by text message. You can create and manage your text message templates in the Text Message Templates section.
Note: You can always change the text message on an individual invoice if needed. This setting just controls what template is selected by default when you send an invoice by text.
Default Estimate Email Settings
This is where you control how estimates are sent to your customers by email.
Default Estimate Email Template — Select the default email template that will be used when sending estimates to your customers by email. You can create and manage your email templates in the Email Templates section.
Attach PDF of Estimate to Email — When enabled, a PDF copy of the estimate will automatically be attached to the email your customer receives. This is useful if your customer prefers to save or print their estimate.
Default Estimate SMS Settings
This is where you control the default text message that is sent to your customers when you send them an estimate by text.
Default Estimate SMS Message — Select the default text message template that will be used when sending estimates to your customers by text message. You can create and manage your text message templates in the Text Message Templates section.
Note: You can always change the text message on an individual estimate if needed. This setting just controls what template is selected by default when you send an estimate by text.
Estimate Acceptance Requirements
This setting controls what is required before a customer can approve an estimate online through their customer portal.
Require Credit Card on File Before Customer Can Approve an Estimate — When enabled, customers will be prompted to add a credit card on file before they are able to approve their estimate online. If the customer already has a card saved in their portal, it will be detected automatically and they can approve without being prompted again.
This is a great option if you require payment information before starting any work.
Default Receipt Email Settings
This is where you control how payment receipts are sent to your customers by email.
Default Receipt Email Template — Select the default email template that will be used when sending payment receipts to your customers by email. You can create and manage your email templates in the Email Templates section.
Attach PDF of Receipt to Email — When enabled, a PDF copy of the receipt will automatically be attached to the email your customer receives. This is a great way to give your customers a record of their payment.
Default Receipt SMS Settings
This is where you control the default text message that is sent to your customers when they make a payment.
Default Receipt SMS Message — Select the default text message template that will be used when sending payment receipts to your customers by text message. You can create and manage your text message templates in the Text Message Templates section.
Note: You can always change the text message on an individual receipt if needed. This setting just controls what template is selected by default when sending a receipt by text.
Default Document Email Settings
This is where you control how documents are sent to your customers by email.
Attach PDF of Document to Email — When enabled, a PDF copy of the document will automatically be attached to the email your customer receives. This is useful when sending contracts, agreements, or any other documents to your customers.
Default Time of Visit Settings
This setting controls whether the time of a visit is automatically added to the invoice when a visit is created or closed.
When Creating or Closing a Visit, Add the Time it Was Closed to the Invoice — When enabled, LawnPro will automatically record the time the visit was completed and add it to the invoice. This is useful if you want your customers to see exactly what time their property was serviced.
Default Chemical Application Email Settings
This is where you control how chemical application records are sent to your customers by email.
Default Chemical Application Email Template — Select the default email template that will be used when sending chemical application records to your customers by email. You can create and manage your email templates in the Email Templates section.
Attach PDF of Chemical Application to Email — When enabled, a PDF copy of the chemical application record will automatically be attached to the email your customer receives. This is useful for customers who want a record of what chemicals were applied to their property.
Invoice Address Settings
This is where you control how your property and company information is displayed on your invoices and estimates.
Property Display on Invoices & Estimates — Controls how properties are labeled above line items on your invoices and estimates. You can choose to show the address only or include additional property information.
Show our Phone Number — When enabled, your company phone number will appear on your customer facing invoices and estimates.
Show our Email Address — When enabled, your company email address will appear on your customer facing invoices and estimates.
Show our Website URL — When enabled, your company website URL will appear on your customer facing invoices and estimates.
Invoice Settings
Late Fees
LawnPro allows you to set automatic late fees for overdue invoices. You can set a late fee as an exact dollar amount or a percentage of the invoice total. You can also set multiple late fee rules at different intervals. For example you could charge $15 after 30 days and $20 after 60 days.
To add a late fee rule:
- Enter the number of days after the invoice is sent that the late fee should apply
- Select whether the late fee should be an exact amount or a percentage
- Enter the late fee amount
- Click Save
- Click Add Late Fee Rule if you want to add another rule at a different interval
Note: Changing late fee rules here does not affect invoices that have already been created. It will only apply to newly created invoices.
Hide Outstanding Balance — When enabled, the customer’s outstanding balance will not be shown on their invoice.
Hide Total Due on Account — When enabled, the total amount due on the customer’s account will not be shown on their invoice.
Show Pending, Draft, Paid in Full and Past Due Stamp on Invoices — When enabled, a stamp will appear on invoices showing their current status such as Paid in Full or Past Due.
Default Invoice Date — Controls what date is used as the default invoice date when a new invoice is created.
Show Invoice Event Date — When enabled, the date the visit was completed or closed will be shown on the invoice.
Show Invoice Due Date — When enabled, the due date will be shown on the invoice. The due date is calculated based on your past due terms and the default invoice date setting.
Set Default Service Date — When enabled, today’s date will automatically be used as the service date when manually creating an invoice.
Show Credit Available — When enabled, any available customer credits will be shown on the invoice.
Accept ACH Payments — When enabled, your customers will be able to pay their invoices using ACH bank transfer.
Accept Credit Card Payments — When enabled, your customers will be able to pay their invoices using a credit card.
Automatically Apply a Customer Credit to Invoices — When enabled, any available customer credits will automatically be applied to new invoices.
Show Invoice Title in Customer Portal — When enabled, the invoice title will be visible to your customer in their customer portal.
Allow Customers to Add a Payment as a Customer Credit — When enabled, customers can add a payment as a credit to their account instead of paying a specific invoice.
Show Tips on Invoices and Allow Customers to Leave Tips When Paying — When enabled, your customers will have the option to add a tip when paying their invoice online.
Default Tax Rate — Set a default tax rate that will automatically be applied to new invoices. This rate will be used unless the customer or property already has a tax rate set.